Drawing Reactions: Taming Catalysts, Reagents, and Crowded Rows with RDKit
In the first post in this series, we built a small toolkit for drawing a single, publication-ready molecule from a SMILES string. This time, we're going to tackle reactions. As a reminder, our running example is a reaction pulled straight from De Novo Chem's Saguaro Chem search platform: a Pd-catalyzed silylation of 4-iodoaniline, shown below.
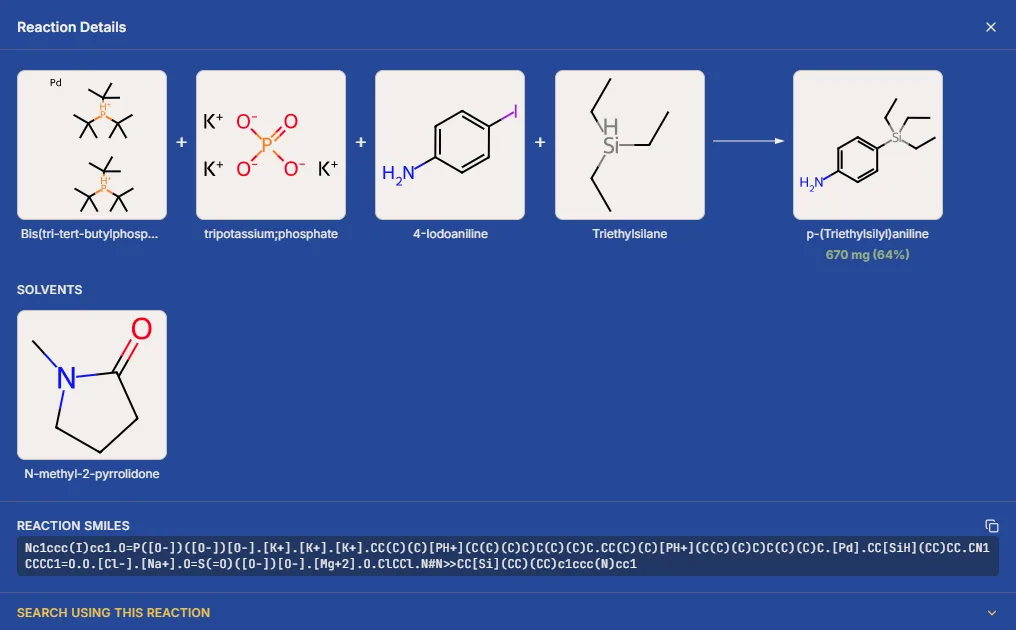
The default reaction drawing
RDKit represents a reaction as a ChemicalReaction object built from a reaction SMILES string. The format is:
reactants>>products
where >> separates the left-hand side from the right-hand side, and multiple molecules on either side are separated by dots. For our running example, we can copy the reaction SMILES directly from Saguaro Chem:
from rdkit import Chem
from rdkit.Chem import Draw

reaction_smiles = "Nc1ccc(I)cc1.O=P([O-])([O-])[O-].[K+].[K+].[K+].CC(C)(C)[PH+](C(C)(C)C)C(C)(C)C.CC(C)(C)[PH+](C(C)(C)C)C(C)(C)C.[Pd].CC[SiH](CC)CC.CN1CCCC1=O.O.[Cl-].[Na+].O=S(=O)([O-])[O-].[Mg+2].O.ClCCl.N#N>>CC[Si](CC)(CC)c1ccc(N)cc1"
rxn = Chem.AllChem.ReactionFromSmarts(reaction_smiles, useSmiles=True)

img = Draw.ReactionToImage(rxn, subImgSize=(400, 400))
img.save("4-iodoaniline_silylation_default.png")

Every molecule-level problem from Post 1 is still here. There are thin bonds, colored atom labels, and cramped labels next to bulkier structures. More importantly, reactions introduce a new issue that single-molecule drawings don't have: the catalysts, solvents, atmosphere, and other entities get drawn as a full structure, sitting in the main row right alongside the reactants and products. For something like a single palladium atom that's merely wasteful. For anything with an actual ligand or a multi-atom base, it turns the whole row into clutter, and it's rarely what you actually want to show. A reader wants to see what's reacting and what comes out; the catalyst, solvent, atmosphere, etc... are context, not the main event.
The fix in this case isn't utilizing drawing options so much as changing what we draw where.
The fix: compose the figure ourselves
Rather than asking RDKit's reaction drawer to lay everything out in one row, we need to pull the reaction apart into its component chemical entities and place each one deliberately:
- Reactants and products get drawn individually using the exact same styling function from Post 1 so that every panel shares the same bond length, font size, and black-on-white palette. Consistency across panels turns out to matter as much as any single panel looking good.
- Agents (catalysts, ligands, etc.) are pulled out of the main row entirely and rendered as a short text label above the arrow. For example
Pd(P(t-Bu)₃)₂instead of the bag of ions taking up its own panel. This is closer to how reactions are actually drawn in a paper: catalysts, solvents, atmosphere, etc... live on the arrow, not in the row. - Reaction conditions (solvent, temperature) get the same treatment as agents where a text label, this time below the arrow, is displayed rather than something you'd have to hand-edit into an image after the fact.
What follows in this post is a natural extension of the toolkit from Post 1 rather than a separate thing: We will use the molecule drawing code from Post 1 to generate molecule panels, then handle the composition of the reaction image ourselves instead of handing the whole reaction to RDKit's built-in reaction drawer.
For a publication scheme, we want reactants on the left, products on the right, catalyst, solvent, time, temperature, atmosphere, etc... above or below the arrow, and all structures drawn at the same scale.
Reagent placement is a layout problem, not a rendering problem
The first thing to realize is that Draw.ReactionToImage is doing exactly what it was designed to do: It draws every molecule in the reaction and connects them with an arrow. It does not know which molecules are "above the arrow" reagents and which are "in the reaction" reactants. That distinction lives in the reaction description, but the visual policy is up to us.
A good reaction scheme separates three things:
- Reactants on the left, joined by
+signs if there is more than one. - Products on the right, joined by
+signs. - Reagents, solvents, and catalysts above and/or below the arrow, as text labels or small structures.
RDKit gives us the pieces to build this. We draw each molecule individually with moldraw.py, then compose the final image ourselves so that agents and conditions can be text labels rather than full structures in the main row. That gives us full control over the layout and the labels.
Naming the agents above the arrow
Even with the layout fixed, the text above and below the arrow still matters. The drawing function accepts labels as explicit strings, so you can write exactly what a chemist would write: Pd(P(t-Bu)₃)₂, K₃PO₄, NMP, or N₂. This avoids the common problem of turning a structure into a readable label: RDKit can give you a SMILES or a molecular formula, but a name like DCM or dichloromethane has to come from a manual label or an external naming source.
We can determine which species are reactants, products, solvents, and atmosphere by examining the reaction details. In the Saguaro Chem Reaction Detail pane below, the roles are already separated for us.
In this scheme we draw 4-iodoaniline, triethylsilane, and 4-triethylsilylaniline in the main row, place Pd(P(t-Bu)₃)₂ and K₃PO₄ above the arrow, and put NMP and N₂ below it.
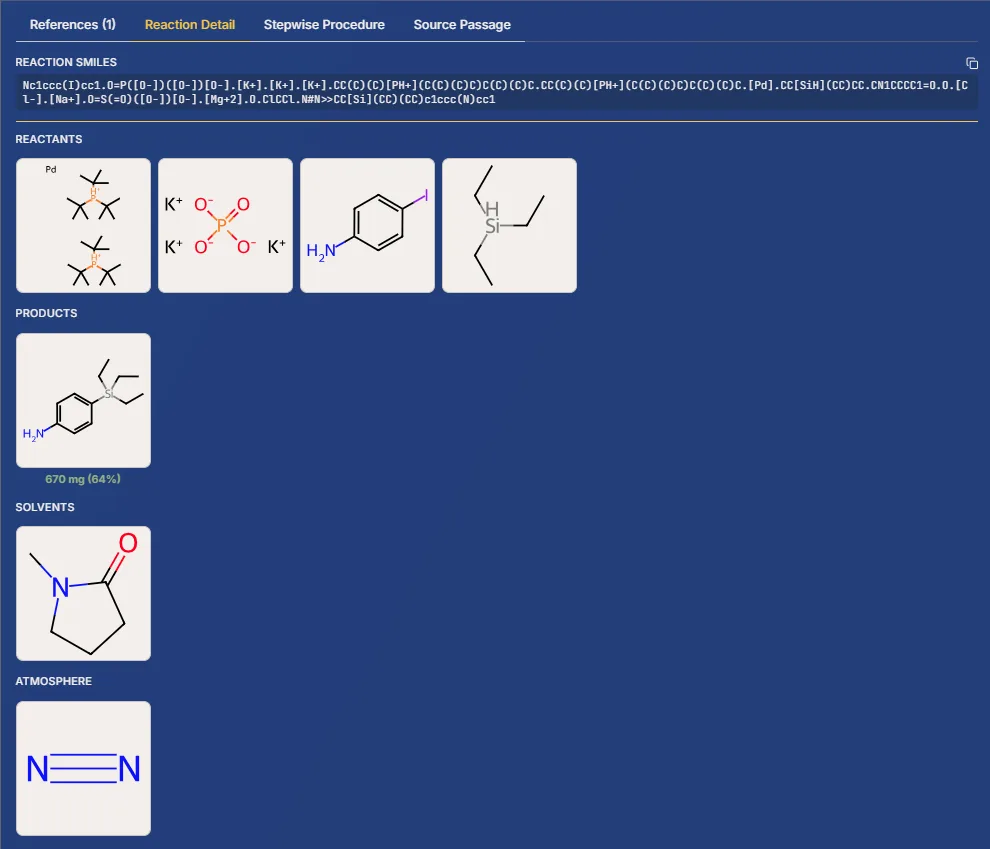
If you're not sure which label to use, you can click on the molecule tiles in the Saguaro Chem Reaction Detail pane to bring up the Molecule Detail panels where you'll find common abbreviations for each chemical. If you don't provide a label, a simple fallback is to derive one from the agent molecules themselves. Molecular formulas are compact and can be suitable for simple cases, even if they are less human-friendly than a chemist's shorthand.
Moving the molecule drawer into its own file
Most of the rendering work in a reaction is still single-molecule rendering. Rather than copying the Post 1 drawing code into every reaction script, we've moved it into a small module called moldraw.py. (In Python, a module is just a file whose functions can be imported by another file in the same folder.) Keeping the drawing code in one place guarantees that every panel in the final reaction uses the same bond length, line width, font size, and palette.
moldraw.py exports four useful pieces:
DEFAULT_STYLE: a dictionary of the drawing options we settled on in Post 1.draw_mol_bytes(mol, size, fmt, style): renders an existing RDKit molecule object without recomputing its 2D coordinates, and returns raw image bytes. This is the key function that letsreaction.pypreserve any alignment that was applied before rendering.draw_molecule_bytes(smiles, size, fmt, style): a convenience wrapper that callsChem.MolFromSmiles, computes 2D coordinates, then delegates todraw_mol_bytes. Use this when you have a SMILES and don't need to control the coordinates yourself.draw_molecule(smiles, path, size, fmt, style): writes the rendered bytes directly to a file. Iffmtis not supplied, it is inferred from the file extension;.svgproduces SVG, anything else produces PNG.
The code is almost identical to Post 1, with one change that matters for reaction work: it returns bytes instead of writing directly to disk. The reaction composer will open those bytes as an in-memory image with PIL.
# moldraw.py
from rdkit import Chem
from rdkit.Chem import AllChem
from rdkit.Chem.Draw import rdMolDraw2D

DEFAULT_STYLE = dict(
    fixedBondLength=30,
    bondLineWidth=2,
    minFontSize=14,
    maxFontSize=14,
    padding=0.08,
)


def _make_drawer(size, fmt):
    return rdMolDraw2D.MolDraw2DSVG(*size) if fmt == "svg" else rdMolDraw2D.MolDraw2DCairo(*size)


def draw_mol_bytes(mol, size=(300, 300), fmt: str = "png", style: dict = None) -> bytes:
    """Render an existing RDKit molecule object, preserving any alignment."""
    drawer = _make_drawer(size, fmt)
    opts = drawer.drawOptions()
    for key, value in {**DEFAULT_STYLE, **(style or {})}.items():
        setattr(opts, key, value)
    opts.useBWAtomPalette()

    rdMolDraw2D.PrepareAndDrawMolecule(drawer, mol)
    drawer.FinishDrawing()
    data = drawer.GetDrawingText()
    return data.encode("utf-8") if fmt == "svg" else data


def draw_molecule_bytes(smiles: str, size=(300, 300), fmt: str = "png", style: dict = None) -> bytes:
    """Render a single molecule from SMILES and return the raw image bytes (PNG or SVG)."""
    mol = Chem.MolFromSmiles(smiles)
    AllChem.Compute2DCoords(mol)
    return draw_mol_bytes(mol, size=size, fmt=fmt, style=style)


def draw_molecule(
    smiles: str,
    path: str,
    size=(300, 300),
    fmt: str = None,
    style: dict = None,
) -> None:
    """Render a single molecule directly to a file."""
    fmt = fmt or ("svg" if path.lower().endswith(".svg") else "png")
    data = draw_molecule_bytes(smiles, size=size, fmt=fmt, style=style)
    mode = "w" if fmt == "svg" else "wb"
    with open(path, mode) as f:
        f.write(data if fmt != "svg" else data.decode("utf-8"))
Why io.BytesIO?
RDKit's PNG drawer returns a raw byte string, not a file on disk. PIL's Image.open() expects something that behaves like a file. The io.BytesIO class wraps a byte string in a file-like object, so PIL can read the image directly from memory. That means we never have to write temporary PNG files for the individual reactants and products; the panels stay in memory until the final reaction image is assembled.
The draw_reaction function
We combine the ideas above into a single public function, draw_reaction. It takes a reaction SMILES, an optional agent label to place above the arrow, optional condition text to place below the arrow, and the output path, then composes the full scheme.
# reaction.py (abridged — see the full file for layout helpers and SVG support)
import io
import html
import re
from PIL import Image, ImageDraw, ImageFont
from rdkit import Chem
from rdkit.Chem import AllChem, rdFMCS, rdMolDescriptors
from moldraw import draw_mol_bytes

PANEL_SIZE = (260, 220)
ARROW_WIDTH = 140
ARROW_TEXT_PAD = 40
GAP = 16
MARGIN = 20
PLUS_W = 40


def draw_reaction(
    rxn_smiles: str,
    path: str,
    agent_text: str | None = None,
    condition_text: str | None = None,
    fmt: str | None = None,
    align: bool = True,
) -> None:
    fmt = _infer_fmt(path, fmt)

    rxn = AllChem.ReactionFromSmarts(rxn_smiles, useSmiles=True)
    agent_text = agent_text if agent_text is not None else _agent_label(rxn)

    # Work on copies so alignment never mutates the reaction object itself.
    reactant_mols = [Chem.Mol(m) for m in rxn.GetReactants()]
    product_mols = [Chem.Mol(m) for m in rxn.GetProducts()]

    # Align each product onto the first reactant so the unchanged scaffold
    # stays in the same orientation across the arrow.
    if align and reactant_mols:
        ref_mol = reactant_mols[0]
        for prod_mol in product_mols:
            _align_product_to_reference(prod_mol, ref_mol)

    if fmt == "svg":
        reactant_panels = [_panel_svg(m) for m in reactant_mols]
        product_panels = [_panel_svg(m) for m in product_mols]
        _draw_svg(path, reactant_panels, product_panels, agent_text, condition_text)
    else:
        reactant_panels = [_panel_image(m) for m in reactant_mols]
        product_panels = [_panel_image(m) for m in product_mols]
        _draw_png(path, reactant_panels, product_panels, agent_text, condition_text)
The key difference from Post 1 is that draw_reaction works directly with RDKit molecule objects (Chem.Mol) rather than SMILES strings. This is necessary because alignment is applied to the molecule's 2D coordinates before rendering, and draw_mol_bytes in moldraw.py preserves those coordinates rather than recomputing them.
Laying out the arrow and labels
The layout helpers compute the geometry of the final figure from a small set of fixed constants. _layout returns the total canvas size and the x-position of every panel, the arrow start/end, and the vertical midpoint. _required_arrow_width measures the agent and condition text using PIL's textlength and adds padding so the arrow is never shorter than its labels.
def _layout(n_reactants: int, n_products: int, arrow_width: int = ARROW_WIDTH):
    """Compute the geometry of the final figure.

    Returns ``(total_width, total_height, reactant_xs, product_xs, arrow_x0, arrow_x1, arrow_y)``.
    """
    panel_w, panel_h = PANEL_SIZE
    total_width = (
        MARGIN
        + n_reactants * panel_w + (n_reactants - 1) * PLUS_W
        + GAP + arrow_width + GAP
        + n_products * panel_w + (n_products - 1) * PLUS_W
        + MARGIN
    )
    total_height = panel_h + 2 * MARGIN

    y = MARGIN
    arrow_y = y + panel_h // 2

    reactant_xs = []
    x = MARGIN
    for i in range(n_reactants):
        reactant_xs.append(x)
        x += panel_w
        if i < n_reactants - 1:
            x += PLUS_W

    arrow_x0 = x + GAP
    arrow_x1 = arrow_x0 + arrow_width

    product_xs = []
    x = arrow_x1 + GAP + 10
    for i in range(n_products):
        product_xs.append(x)
        x += panel_w
        if i < n_products - 1:
            x += PLUS_W

    return total_width, total_height, reactant_xs, product_xs, arrow_x0, arrow_x1, arrow_y
_draw_png pastes each molecule panel onto a white PIL canvas, draws the arrow shaft and arrowhead, then calls _draw_markup_text to place the agent and condition labels centered above and below the arrow. _draw_svg does the same thing with SVG elements, embedding each molecule's SVG into the parent document with <svg x="..." y="..." viewBox="..."> tags.
reaction.py infers the output format from the filename. Pass it output.png and it composes a PNG; pass it output.svg and it embeds molecule SVGs into a parent SVG. The conceptual layout is identical; only the rendering backend changes. You can override the inference with --format png or --format svg.
Aligning the heavy-atom scaffold across the arrow
So far each molecule has been drawn with its own canonical 2D coordinates. That's fine for simple reactions, but when a reactant and product share a large scaffold, it is much easier to see what changed if the shared part is oriented the same way on both sides of the arrow. Saguaro Chem does this by aligning the product to the reactant using their maximum common substructure (MCS).
We can do the same thing in Python. The idea is:
- Pick the first reactant as the reference.
- For each product, compute the pairwise MCS with the reference, requiring that atom types match (
CompareElements) and bond orders match (CompareOrderExact). - If the MCS has at least 4 heavy atoms, use that mapping to perform a rigid-body alignment of the product onto the reference with
AllChem.AlignMol. - If the MCS is too small, or either molecule is multi-fragment, fall back to the standard canonical coordinates.
Because moldraw.py exposes draw_mol_bytes(mol, ...) in addition to draw_molecule_bytes(smiles, ...), the reaction composer can render an already-aligned molecule object without regenerating its coordinates.
# reaction.py
from rdkit.Chem import rdFMCS


def _is_multifragment(mol) -> bool:
    """Return True if the molecule SMILES contains a dot (multiple fragments)."""
    return "." in Chem.MolToSmiles(mol)


def _align_product_to_reference(product_mol, ref_mol, min_mcs_atoms: int = 4) -> bool:
    """Rigid-body align product_mol onto ref_mol using their pairwise MCS."""
    if _is_multifragment(ref_mol) or _is_multifragment(product_mol):
        return False

    AllChem.Compute2DCoords(ref_mol)
    AllChem.Compute2DCoords(product_mol)

    mcs = rdFMCS.FindMCS(
        [ref_mol, product_mol],
        atomCompare=rdFMCS.AtomCompare.CompareElements,
        bondCompare=rdFMCS.BondCompare.CompareOrderExact,
    )

    if mcs.numAtoms < min_mcs_atoms:
        return False

    mcs_mol = Chem.MolFromSmarts(mcs.smartsString)
    ref_match = ref_mol.GetSubstructMatch(mcs_mol)
    prod_match = product_mol.GetSubstructMatch(mcs_mol)

    if len(ref_match) < mcs.numAtoms or len(prod_match) < mcs.numAtoms:
        return False

    atom_map = list(zip(prod_match, ref_match))
    try:
        AllChem.AlignMol(product_mol, ref_mol, atomMap=atom_map)
        return True
    except Exception:
        return False
draw_reaction() calls this for every product by default. To disable it, pass align=False or use the --no-align flag on the command line:
python reaction.py "reaction_smiles" output.png --no-align
The result is a scheme where the unchanged benzene ring of 4-iodoaniline stays at the same angle in the product, and the newly added triethylsilyl group is the only part that visibly shifts. That makes the transformation readable at a glance.
Passing labels to the helper
The final step is to pass the labels as strings. In most cases, use the abbreviations shown in Saguaro Chem's Reaction Detail pane because those are the agreed-upon names for the catalyst, base, solvent, and atmosphere. You can override them when a specific in-text abbreviation is called for, or when a reagent isn't in Saguaro Chem:
agent_text = "Pd(P(t-Bu)₃)₂, K₃PO₄"
condition_text = "NMP, N₂"
draw_reaction(
    reaction_smiles,
    "4-iodoaniline_silylation_final.png",
    agent_text=agent_text,
    condition_text=condition_text,
)
Or from the command line. Most terminals cannot easily type Unicode subscripts, so reaction.py supports a tiny markup syntax for labels: surround text with ~ for subscripts and ^ for superscripts. K~3~PO~4~ renders as K₃PO₄, and N~2~ renders as N₂.
python reaction.py "reaction_smiles" output.png \
    --agents "Pd(P(t-Bu)3)2, K~3~PO~4~" \
    --conditions "NMP, N~2~"
Change the extension to .svg for a scalable vector output.
Final scheme
Putting it all together gives a reaction scheme that looks like something a chemist would draw:
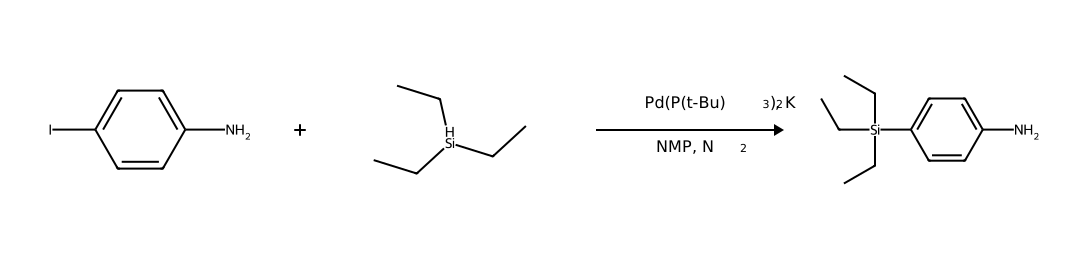
Compared with the default ReactionToImage output, the molecules are the same size, the arrow has room for labels, and the catalyst and solvent are described in text rather than drawn as full structures. Products are also aligned onto the first reactant using their maximum common substructure, so the unchanged scaffold keeps the same orientation across the arrow and the structural change is easy to spot. None of this requires custom rendering beyond what we already built for single molecules in Post 1. The PNG route uses PIL for the arrow and labels; the SVG route inlines each molecule SVG into a parent SVG and draws the arrow and labels with SVG elements.
Next up: in Post 3, we'll add highlighting, atom mapping, and annotations so we can mark reaction centers, highlight matched substructures, and add legends to our figures.